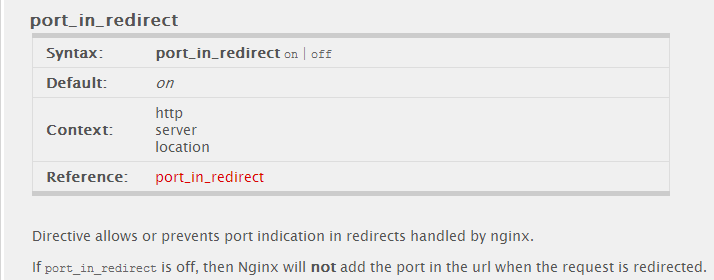
在使用Nginx时,可能有时不需要让Nginx监听80端口,甚至在前面再加一个Squid,Varnish之类的HTTP缓存。 但是访问子目录时,除非在子目录后面再加一条“/”,否则就会遇到网址自动重定向至Nginx监听的端口。假设你Nginx站点监听的端口是123,你本来访问的地址是http://domain.com/wp-admin,会自动重定向至http://domain.com:123/wp-admin 这样明显会对服务器造成很大的威胁,要知道后端可是很重要的,如果后端端口暴露出来,就可能会被人直接对这个端口进行诸如CC之类的攻击…… 在Nginx的核心模块的文档中,有这样一个配置: [ […]
解决添加Zend Guard Loader后探针检测仍然显示小红叉
可能有些人会用到SHOPNC这类用Zend加密的程序,因此需要添加Zend Guard Loader,不过安装好后用探针检测,可能会出现以下情况——Zend Guard Loader旁边显示小红叉。例如安装DirectAdmin时选择PHP5.3并且选择添加Zend时,就会出现这种情况: 我们来看看Zend的官方说明文档:
|
1 2 3 4 5 6 7 8 9 10 11 12 13 14 15 16 17 18 19 20 21 22 23 24 25 26 27 28 29 |
Zend Guard Loader installation instructions ------------------------------------------- 1. Extract the Zend Loader package. 2. Locate and extract the ZendGuardLoader.so (Linux) or ZendLoader.dll (Windows) that corresponds to your php version. 3. Add the following line to your php.ini file for loading the ZendGuardLoader: Linux and Mac OS X: zend_extension=<full_path_to_ZendGuardLoader.so> Windows non-thread safe: zend_extension=<full_path_to_ZendLoader.dll> 4. Add an aditional line to your php.ini for enabling ZendGuardLoader ; Enables loading encoded scripts. The default value is On zend_loader.enable=1 5. Optional: following lines can be added your php.ini file for ZendGuardLoader configuration: ; Disable license checks (for performance reasons) zend_loader.disable_licensing=0 ; The Obfuscation level supported by Zend Guard Loader. The levels are detailed in the official Zend Guard Documentation. 0 - no obfuscation is enabled zend_loader.obfuscation_level_support=3 ; Path to where licensed Zend products should look for the product license. For more information on how to create a license file, see the Zend Guard User Guide zend_loader.license_path= 6. If you use Zend debugger as well, please make sure to load it after the Zend guard Loader 7. If you use ioncube loader, please make sure to load it before Zend guard Loader 8. Restart your Web server. |
明文说明需要添加zend_loader.enable=1,执行此命令可以检查php.ini有没有这一行代码(仅仅适合PHP-CLI/CGI,FPM的用find命令找出来后手动检查): [crayon-6984 […]
LNMPV0.3 Stable For Ubuntu 12.*/Debian 6/Debian7/CentOS6 32Bit or 64Bit
从今天开始,LNMPV的网站正式启用,以后新版均在http://www.mke2fs.com发布 LNMPV 0.2 Stable: 昨天发布了LNMPV 0.1测试版,感谢http://imlonghao.com/这个勇敢的小白,试用了我的LNMPV0.1,告知了我很多BUG,经过昨晚的努力,终于解决了。 另外还要感谢单手摘JJ,经过他昨晚的提醒,让我恍然大悟,发现可以一站一POOL来实现PHP以特定的用户身份执行。从而解决跨站问题。 本次更新: 1 )使用sock方式链接PHP-FPM 2 )添加可选的一站点一POOL的功能 3 )修改PHP-FPM的进程上限 4 )修改PH […]
博客,三周年
三年前的昨天,是我的博客诞生之日。 如果没看到右边栏的倒计时已经变成“在XXXXX之前”了,我都没发现三周年已过…… 博客如何诞生,谈了两年了,不想再说…… 这一年里面,最最最最最感激的人,非飛天鼠莫属。在这可以估量的九个月中,他对我人生的影响,是无法估量的…… 现实生活中,我比较内向,没什么朋友,除了和他聊天,就是和他聊天。不仅让我学会很多东西,同时还给我带来很多欢乐…… 三言两语难说尽,此处省略大概一万字…… 第二个要感谢的人,开玩笑。最让我印象深刻以及感动的是,新年期间,我没有向他提出任何的要求,更从来没有想过要别人给我东西,但是居然主动送了我一个QQ会员,这是前所未有的…… 如果没有他 […]
PPTP自动安装配置Shell Script For Ubuntu/Debian

呵呵,不解释…… 使用方法:
|
1 |
wget http://soft.yzs.me/pptpd.sh;sh pptpd.sh |
执行后会自动列出你服务器的网卡的IP,挑一个外网的:
|
1 2 3 4 5 6 7 8 9 10 11 12 13 14 15 16 17 18 19 20 21 22 23 24 25 26 27 28 29 30 31 32 33 34 35 36 37 38 39 40 41 42 43 44 |
=========================== Which IP is your server IP: IP:42.51.133.125 #这里输入你服务器的外网的IP地址 =========================== Server IP:42.51.133.125 =========================== =========================== eth0 Link encap:Ethernet HWaddr 00:16:3e:4e:25:11 inet addr:42.51.133.125 Bcast:42.51.133.255 Mask:255.255.255.0 inet6 addr: fe80::216:3eff:fe4e:2511/64 Scope:Link UP BROADCAST RUNNING MULTICAST MTU:1500 Metric:1 RX packets:1285668 errors:0 dropped:6798 overruns:0 frame:0 TX packets:133636 errors:0 dropped:0 overruns:0 carrier:0 collisions:0 txqueuelen:1000 RX bytes:229411554 (229.4 MB) TX bytes:12212001 (12.2 MB) Interrupt:32 lo Link encap:Local Loopback inet addr:127.0.0.1 Mask:255.0.0.0 inet6 addr: ::1/128 Scope:Host UP LOOPBACK RUNNING MTU:16436 Metric:1 RX packets:8 errors:0 dropped:0 overruns:0 frame:0 TX packets:8 errors:0 dropped:0 overruns:0 carrier:0 collisions:0 txqueuelen:0 RX bytes:702 (702.0 B) TX bytes:702 (702.0 B) Please input the netdriver of your server: Net Driver:eth0 #这里输入你刚刚输入的那个IP地址属于哪个网卡(上面已经列出来了) =========================== Net Driver:eth0 =========================== Please input the username of PPTP: Username:vpn #这里输入连接的用户名 =========================== PPTP Username:vpn =========================== Please input the password of PPTP: Password:vpn #这里输入连接的密码 =========================== PPTP Password:vpn =========================== Press any key to continue. #按任意键继续 此处省略几万字…… |
这是添加连接的账号和密码的Shell Script:
|
1 |
wget http://soft.yzs.me/pptpd-adduser.sh |
添加账号,就执行:
|
1 |
sh pptpd-adduser.sh |
输入账号密码即可…… Good luck……
